31 October 2015

Scrapbook Boutique - October 2015 Challenge

If you would like to check out my original Caring Hearts Card Drive post, click here!

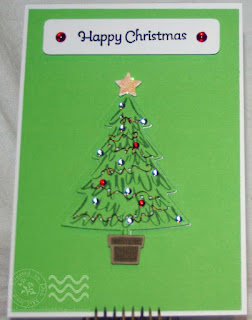
Happy Christmas

Thankfully, I've finally gotten around to creating something to enter this month's Challenge at Scrapbook Boutique (only just!)  Such a wonderful colour combination:
To me, this screams "Christmas"!  [I'm very traditional with my Christmas colours.]  And so, with cards still to design and create for the Caring Hearts Card Drive, I thought I'd use this inspiring colour palette to help me out!
I have used the new 'Perfect Pines' dies and co-ordinating 'Peaceful Pines' stamp set from Stampin' Up! to create my tree.  The diecut of the tree, the star and the pot are all popped up on the card base to add dimension.  I have also threaded some coiled red wire across the tree for tinsel, and added a few Sprinkles for baubles.  My sentiment has been heat embossed with black and popped up, with a few Sprinkles at each end.

This is a really easy design to create, and I am sure I can create a couple more for this year's Card Drive!

Thanks for visiting!
Deb.xx


30 October 2015

Kraft+ ~ Inspired by Nature Challenge

To see my post about the Caring Hearts Card Drive, click here!

Maggies

My, my, how quickly October has disappeared!! I almost didn't make it to enter this month's challenge over at Kraft+ ~ Inspired by Nature!
Thankfully I've been able to get myself a bit organised so I could put together a layout to enter!  My topic for this layout is so in tune with the theme of this challenge - Magpies!  I have a delightful group of Maggies nesting near my house, and instead of being swooped by them anytime I go outside, I decided to make them my friends by feeding them.  Now, when I walk out my door and whistle, they come gliding in and virtually eat out of my hand...
I have used a piece of Corrugated Card from Kaisercraft for my background, and dressed it up with some white gesso and black Gelatos.  I love how the gesso sits in the grooves of the corrugations to add it's own 'layer' of interest...

One of my Maggies was kind enough to leave me a feather which I have incorporated into my title by putting it under my chippie letters.

I have added some string under the photos and popped the photos up on cardboard.  I found some chipboard feathers in my stash that I have coloured with Stampin' Up! Craft Ink in Whisper White and Basic Black to replicate the Magpie feather.  I distressed some black paper by scrunching it up, and then lightly inking up the texture with Whisper White craft ink. 

I also dried and pressed a few tea rose flowers from my [one and only] rose bush to incorporate onto the page and add a bit of colour.  I created my own 'grass' by randomly cutting some bits of green cardstock into blades and stuck together.

It's a very simple page, but I love how it came together.  I love my Maggies and I hope they stay around for many years to come!

26 October 2015

Horror Movie - a spooky layout

To see the Caring Hearts Card Drive post, click here!

Horror Movie


Here is a layout I've done for a Facebook group challenge, the criteria being for it to be spooky!
I've grabbed the solo and class photo from my son's School Production of "Horror Movie" from last year to use as my 'spooky subject'.  He makes such a happy, cute-looking Zombie!

There are a lot of different techniques for this one, starting with using Gelatos and water on the black background to make the eyes and mouth.  Then I distressed around the edges of the cardstock and added DecoArt Metallic Lustre in 'Black Shimmer'.  The torn out edges have been 'filled' with crinkled and distressed red cardstock, and then highlighted with DecoArt Metallic Lustre in 'Radiant Red'.  The green of the eyes has been highlighted with DecoArt Metallic Lustre in 'Elegant Emerald'.  [Can you guess what new products I have to play with??!]

I smeared some Whipped Spackle across the page and heat-set it, and then used the 'Black Shimmer' Metallic Lustre to add stitches.  I've used grey and orange paper, distressed with water and crinkled up, to break up the photos and give the page some interest.  I also mixed up red Gelato with water in a mini mister and sprayed drops of 'blood' on the page.

For my title, I used chipboard letters "H" and "M", and heat embossed them white.  They then got soaked in some Dylusions spray 'Postbox Red' to give the appearance of blood.  The remaining letters were painted onto the background using a couple of layers of Gesso [the negative space of my set of chipboard alphas was used as a guide].  The purple outline of each letter has been made by mixing Gel Medium with 'Crushed Grape' Dylusions spray and outlining each letter with a brush.

Finally, I've added some 'brains' doodling to the top left hand corner, some red, bloodshot eye doodling to the whites of the eyes on the background and a handful of purple grey and black enamel dots.

This layout was a lot of fun to make!  Thanks for stopping by!

Deb.xx

13 October 2015

A 'Special Order' wedding card

To see the Caring Hearts Card Drive post, click here!

Congratulations

Here is a wedding card that I've just made at the request of a friend.  Her brother is getting married, and she wanted to give a handmade card.
I have used a lovely watermarked parchment paper as the 'topper' for the card, and I've used Indigoblu 'Flitterglu' with some silverleaf to gild my bouquet stamp randomly across the topper.  (The bouquet stamp is from the Penny  Black stamp set 'Special Day'.)

The "Congratulations" sentiment is from the [retired] Stampin' Up! set 'Love & Laughter', and it has been stamped in Versafine Onyx Black.

The silhouette die has been cut from smooth grey cardstock.  I've then inked it up with Versamark Dazzle 'Frost' ink, and then heat embossed it with clear embossing powder.  Unfortunately the photo doesn't do it justice - there is a beautiful shimmer under the shine of the clear embossing.

I have also lined the card with the same watermarked parchment paper.

All the best to the soon-to-be-newlyweds!

Deb.xx

11 October 2015

A Quick Layout

 To see the Caring Hearts Card Drive post, click the link!

The Pool

I have put together a quick layout (between cardmaking sessions) to enter into my friend Jodie's Facebook group monthly competition.  The criteria for the month of October was "bright" - okay!!!

I have used a few new products for this layout!  Starting with the Ken Oliver Colour Bursts in blue (and a bit of yellow) - these things are awesome!  What an easy way to create an effective and beautiful background!  I started by 'misting' water over the white background page and then lightly tapping the Colour Burst powder over it to activate the powder where it landed on the mist.  I then sprayed through the middle to create more of a puddle and added a bit of yellow to get a more aqua colour.  Once there was a good amount of liquid, I swirled my brush through in a circular motion, and then tipped the page around to allow the liquid to run in rivulets along the circular pattern.  I played around with this a bit more to get the look I was after.

Next I wanted to create an acetate panel to give some dimension to the page.  But I knew anything I did to the acetate would be lost on the background unless I backed it up with white card.  So I created my panel and backing card and then I used some Dylusions spray and dropped that onto the acetate, and then using a brush and Isocol rubbing alcohol, I worked the colour around on the acetate.  This gave a very cool watery feel.  To add further depth to this element, I used more of the Dylusions ink with Isocol to create the illusion of bubbles and 'water surface variation' at the top of the white card underneath the acetate.  I love how this turned out!

In my 'stash' of scrapbooking papers, I managed to find an old TCW sheet called "Pool" from the Colours of My Life range.  I've fussy-cut out my title 'The Pool" as well as the more sentiment-type thing "Splish Splash".  The colour of the TCW sheet was the wrong blue for my layout.  So I used 'Peacock Feathers' Distress Ink and water, with a brush, to add more of my aqua colour to the title pieces.  I also splatted some of that colour ink over the "Splish Splash" element.

I coloured up two lots of texture paste - one lime/yellow-ish and the other orange to replicate the colour of my kids' goggles in the photos.  This was stencilled on using a Kaisercraft stencil design.  However, once it was dry, the blue from the Colour Bursts on the background and bled through and changed the colour a bit too much.  So I used my Sakura Gelly Roll Pens to re-colour my texture paste.

I did a little tear down the left hand side and put some Stampin' Up! DSP of water behind it, and then used my new DecoArt Metallic Lustre in 'Black Shimmer' around the tear and smeared it along the edges.

The photos have been popped up on cardboard, and some enamel dots and journalling added.  I love how this page has come together and that I got to play with new stuff!!

Deb.xx

10 October 2015

First Design for Caring Hearts Card Drive 2015

To see the Caring Hearts Card Drive post, click here!

"Seasons Greetings"

I just wanted to quickly share my first 'official' card design for this year's Caring Hearts Card Drive.
I had cut out one of the "Delicate Ornaments Thinlits Dies" by Stampin' Up! from some Inkadinkado Masking Paper.  I put that on a piece of cardstock and using the Flitterglu and stamping foam from Indigoblu, I randomly 'inked up' through the mask and around it.  I then applied the "Winter Dawn" Mega Flakes and scrubbed off the excess.  I also applied the Flitterglu around the edges and dipped them into the Winter Dawn Mega Flakes to add that detail around the edges.

I cut out the ornament topper from the "Delicate Ornaments Thinlits Dies using some dark silver shimmer paper and added some of the new "Silver Metallic Thread" by Stampin' Up!  As a final touch, I stamped the sentiment from my JustRite "Christmas Mini Sentiments Set" using Versafine Onyx Black.

I'm rapt with how this came out!  I now want to get more colours of the Mega Flakes to give a different effect.  Also, next time I won't use the masking paper as it perished after one application of the Flitterglu.  Instead, I will try with Xpress It Masking Film instead.

Please get behind the Caring Hearts Card Drive 2015 - it is such a worthy, feel-good thing to do!

Please include #caringheartscarddrive to your social media updates about this event!  It would be awesome for 'kindness' to trend!

Deb.xx

06 October 2015

The Caring Hearts Card Drive

It's time again for the 6th Annual Caring Hearts Card Drive!  This wonderful event came to Australia for the first time last year, and we're at it again in 2015!  The CHCD is the brainchild of Vera Yates (Ling) which she started in 2010, in honour of her mum.  Here's a bit more information directly from Vera's blog post:

"We are back for the 6th year for our annual Caring Hearts Card Drive. The purpose of our card drive is to collect holiday cards for the elderly that lives in nursing homes. I started this card drive 6 years ago, in 2010 in honor of my mom. That first year, we collected 750 cards.
And each year it continue to grow bigger.
Last year we received over 17,000 cards and branched out to Australia!!

It was such an amazing year.

Jennifer McGuire and I are excited to continue this journey and we really hoping that we can bring holiday cheers to many, many more nursing homes. 

We have a few ladies helping us in collecting the cards. Tina Schrof is working with Jennifer in collecting the cards. Since international shipping is expensive, those of you in Canada can mail your cards to Anita or Caroline and they'll distribute the cards. 
And, for those of you in Australia, you can send to Linda.
:)


The holidays are about family, kindness, and joy. During this time many of the elderly who lives in nursing homes would really feel the loneliness or missing their family. Wouldn't it be so awesome if we can bring a smile to their face & brighten their holiday season simply by sharing our love of card making? A simple gesture to let them know that they are not forgotten.
That someone still thinking of them.


We all love making cards and what’s better than knowing our creations can bring a smile to others, right? Some helpful people already agree to help us deliver the cards to selected nursing homes. 

A few important details:

  • This card drive will be going on from October 3 to November 27, 2015. We need to receive your card by November 27, 2015.
  • Please make the cards for Christmas or Holiday Wishes. Anyone can send a card, your children, church group, scout troops, etc.
  • All cards need to have a message in it (it can be stamped or hand written).  
  • Please sign your name and where you are from. 
  • Please include an envelope for each card and please don't seal the envelope.
  • Please stick to just cards (standard size A2 or 4-1/4" x 5-1/2")
  • And please don't use any pins (safety reason).
  • This is totally optional. But, if you'd like to include $1 or $2 to help with shipping, it'll be much appreciated. We cover the shipping cost ourselves, with no sponsor, so any donation toward shipping would help tremendously.
You can mail the cards to:

  • Vera Yates, 1314 Roy St., Houston, TX 77007
  • Tina Schrof , 185 W. Pugh Drive, Springboro, OH 45066
  • Linda Langes, c/o Gilston State School, 588 Worongary Road, GILSTON QLD 4211, Australia
  • Piney-fine, Attn: Anita, P.O. Box 30, Piney, MBR0A 1 K0, Canada
  • Caroline Bredeson, 7 Brown Street, Ottawa, ON K1S 1L9, Canada

In each package, PLEASE include THIS SUBMISSION FORM.  This helps us in keeping track for prizes! For each card you send, you will get a chance.  So the more cards you send, the better your chances. 
To thank you for your generosity in supporting this drive, we have several PRIZES ready for several winners. There will be many winners and remember… the more cards you send the better your chances. :)

Also, if you 'd like to help us promote the card drive, whenever you're sharing your projects for Caring Hearts on social media, please use the hashtag #caringheartscarddrive . Hey, wouldn't it be so cool if we can make kindness trending?

I'll update the prize list as more prizes coming in. And huge thank you to all the fabulous, generous companies who support this card drive by donating awesome prizes. "

Head to Vera's Blog to check out the AMAZING list of prizes. - See more at: http://ahappyscramper.typepad.com/a_happy_scramperscrapbook/2015/10/the-caring-hearts-card-drive-for-2015.html#sthash.BzuRFIVH.dpuf
Head to Vera's Blog to check out the AMAZING list of prizes.

So, it's time for cardmakers to come together to create their gorgeous Christmas/Holiday cards, to be received by residents in Aged Care Facilities to brighten up their holiday season.  

I had a great time organising a mini-fundraiser for my kids' school to be involved in this initiative last year, and we sent off over 100 cards!  I made the cards (with the help of some willing accomplices) and donated them to my kids' school.  The school then sold them at $2.00 per card to our students.  Of the $2.00, $0.70 was donated to cover postage costs, and then the school made a profit of $1.30 per card after that. 

This year, I have agreed to help the totally gorgeous Linda Langes with facilitating the Victorian end of this fantastic initiative!  I will be contacting Aged Care Facilities across Victoria to see if they would like our cards sent to their residents.  I will also be collecting any Victorian cards that crafty people send through to me for distribution, at the following address:

Details removed...

Please share details of The Caring Hearts Card Drive on your own blog and through other social media channels to help us make 2015 a bigger and even better year for this drive, and more importantly, to bring some holiday joy into aged care facilities across this great land (and around the world)!

Deb.xx

Also Aussie cardmakers it would be awesome if you could  Download these CHCD Labels and stick one on the inside of your handmade cards. I feel that helps the recipients understand a little better why they are receiving the card. - See more at: http://ahappyscramper.typepad.com/a_happy_scramperscrapbook/2015/10/the-caring-hearts-card-drive-for-2015.html#sthash.BzuRFIVH.dpuf

01 October 2015

Pixels and Paper ~ Joining the team!

timeless

I am so proud, and beyond ecstatic, to announce that I have been asked to join the Pixels and Paper Challenge Blog Design Team!  Thank you so much Jane for the invitation, and thank you also to the other wonderful members of this talented DT for their warm welcome!

Our inspiration for this month is this marvellous photo of Big Ben!
My paternal grandmother was English, and so I wanted to use photos of her for this layout.  I selected a lovely photo of Grandma and Grandad taken in 1943, as well as a copy of Grandma's Identity Card.  As she was born outside of Australia, she was considered an 'alien'.  During the War Years, 'aliens' were required to carry their Identity Cards with them when in public.  Here is my layout for this month:
Starting with a piece of black cardstock, I wanted to try to recreate the angle of the photo of Big Ben.  Using Stampendous "Spoonful of Gold Dust" (a yummy embossing product I picked up at the recent Paperific Expo in Melbourne), I put scatterings of it on my cardstock and heated it from underneath with my heat gun.  I love the flaky bits! I then mixed up some Whipped Spackle with some "Gold Champagne" Gelato and stencilled that through one of this season's Stampin' Up! stencils, again on an angle to replicate the photo.

As I set this aside to dry, I started on my clock.  The chipboard clock is the 3" Clock Face by Imaginarium Designs.  I coated it with Encore Gold ink pad, and then clear embossed over the top of it.  I then heat embossed the hands with black.  I cut a circle out using SU! Circle Dies, and then ran it through my SU! "Decorative Dots" embossing folder to replicate the texture on Big Ben's clock face.  [You may also notice that my clock is set to the same time as on Big Ben in the photo.  I'm quirky like that!]
When I printed out my photos, I was concerned that they looked "too new".  So, instead of the distressing technique of scratching up the surface, I decided to apply a layer of Distress Crackle Paint "Rock Candy".  I've tried this on photos before and the effect is marvellous!  I love the egg-shell crackle effect and the uneven texture.

To create the layout, I started by cutting out a Spellbinders rectangle frame from black cardstock to put behind the Identity Card.  This was then matted onto a piece of Creative Memories Storybox paper that had been further coloured with "Tea Dye" Distress Ink.  The black frame also had some dark gold metallic lustre rub applied to it to bring out the embossing.

I put a gold piece of Spellbinders Precious Metals into an SU! embossing folder to give it some texture.  This was then used to border the photo of Grandma and Grandad.  I have added some torn up and distressed paper strips as additional layers to break up the colours a bit.

I have journalled the story behind the Identity Card onto a Fundamentals gold tag, and this had been adhered with a Kaisercraft brad that has a clockface on it.  (This brad has also been heat embossed with some Tinby Designs Metallic Melts.)  There is a small resin square with a clockface on it from Scrappers Garden that found it's way onto the page as well.

For a final touch, I have added the word "timeless" as my title, from the Tim Holtz Idea-ology "Big Chat" set, and put the saying "no beauty shines brighter than that of a good heart" from the "Small Talk" set.  My Grandma (who became known as Grandma Frankston) had the best heart of anyone I've ever known.

I hope you like my first layout as a member of this marvellous team!  Thanks for visiting and I look forward to everyone else's creations!!

Deb.xx